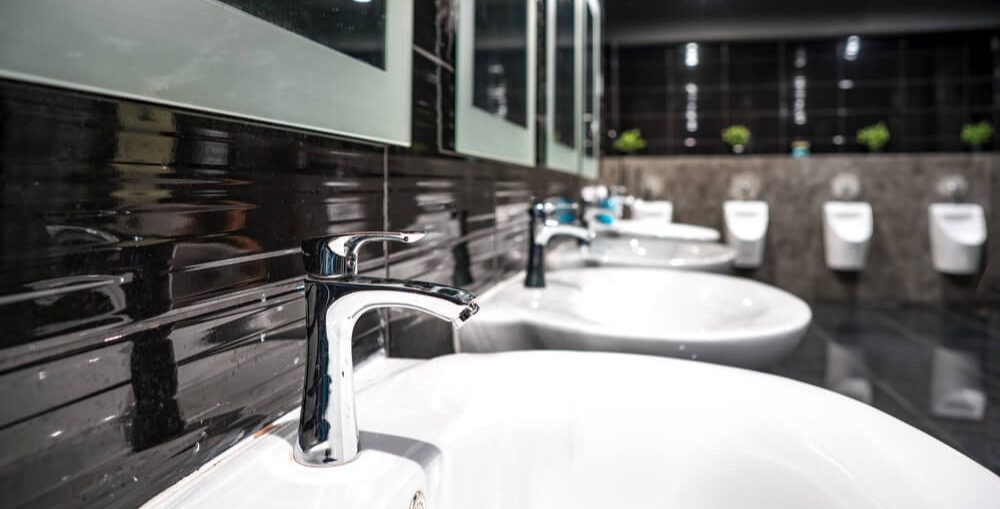
In the average commercial facility, restrooms take up 5% of the space but contain 20% of the dirt and account for 80% of building complaints.
No business wants their guests to leave with a negative impression solely based on their restroom’s appearance. Think about when you meet someone for the first time and the positive or negative impression they leave you with. Similar to the first impression of meeting someone, the impression your facility’s restroom will leave on your guests is equally important. They will remember it, especially if it is poorly maintained.
Your business works hard to provide quality products and/or services to patrons, and a dirty and smelly restroom should not be the first or last thing left on your guest’s mind.
By performing a consistent restroom cleaning procedure, you can increase restroom cleanliness, boost customer satisfaction, and improve your facility’s image.
Want a copy of these 14 steps to cleaning a commercial restroom?
Download Your FREE Steps to Clean a Commercial Restroom Poster
Preparing to Clean
It is important to begin any cleaning procedure with the proper tools, commercial cleaning supplies, and personal protective equipment.
Required Tools, Materials, & Equipment:
Equipment:
Custodial cart
Waste collection receptacle
Trigger sprayers for both harsh and corrosive chemicals
Mild cleaning chemicals
Tank/pump-up sprayers
Floor squeegees
Mop buckets and wringers
Wet mop handles and holders
Brooms
Dustpans
Dust mop
Signage
Materials:
Sponges
Bowl Mops
Microfiber cloths
Wipes
Gloves
Goggles
Wet Mop Heads
Supplies
Neutral/General Purpose Cleaners
Acid Cleaner
Bowl Cleaner
Cleaner/Disinfectant
Drain Opener: Acid or Enzyme
Window/Glass Cleaner
Metal Polishes
Deodorizers
Trash Can Liner
Toilet Tissue
Paper Towels
Toilet Seat Covers
Sanitary Napkins
Hand Soaps
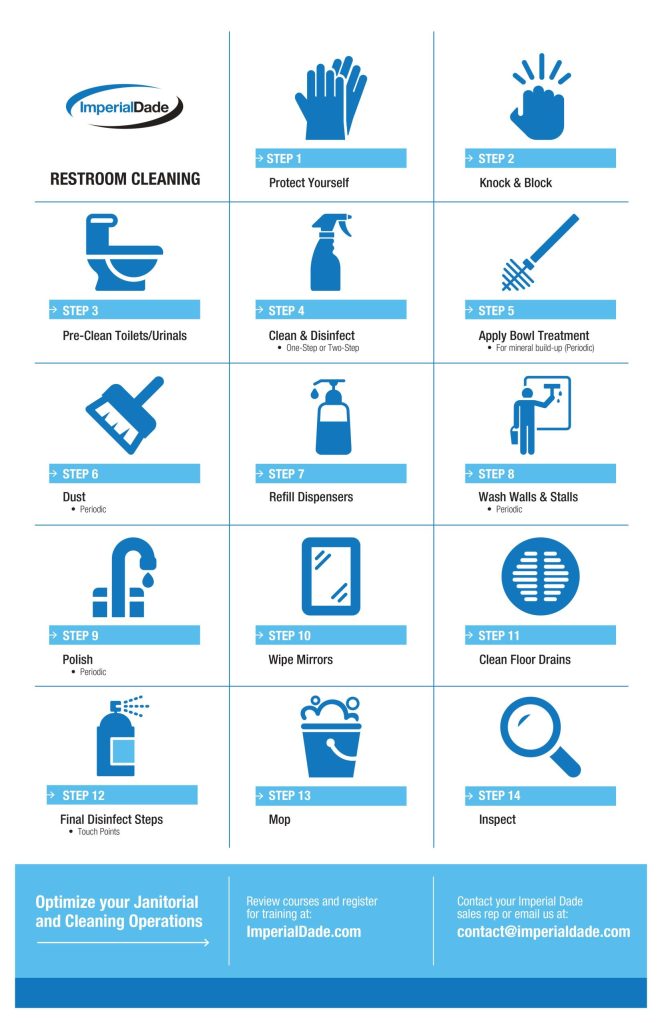
The following provides an explanation to the Cleaning Management Institute (CMI) 14 step restroom cleaning procedure.
14 Steps to Cleaning a Restroom
1. Protect Yourself
Always start by putting on the proper personal protective equipment.
Gloves are necessary when completing any cleaning procedure. If you will be working with vertical surfaces such as shower walls or mirrors, or using a spray of any kind, you will likely want to wear goggles to avoid getting any splash back.
2. “Knock and Block”
“Knock” on the door and announce that you are about to begin restroom cleaning procedures.
Check the restroom for any guests. Make sure that there is no one inside before entering.
Once you have made sure that no one is left in the restroom, “block” entry to the restroom by posting “restroom cleaning in progress” and “wet-floor” signs outside the entry/exit doors.
Look for any damage or heavily soiled areas which you will have to spend more time on.
Pro Tip:During any cleaning procedure, remember three key rules:
Clean from top to bottom.
Clean from wet to dry.
Work from the inside of the area/room out towards the exit.
3. Pre-Clean Toilets and Urinals
Remove any debris from in and around the toilet and urinals. Place any urinal strainers in a bucket of disinfectant solution.
Flush the toilet to make sure it is clear and working properly.
Remove all visible soils with a multi-purpose cleaner or cleaner/disinfectant.
Pretreat the toilet exterior and allow to stand for the recommended wet dwell time.
Pro Tip: What is Dwell Time?
Dwell time is the amount of time a disinfectant needs to remain wet on a surface to effectively disinfect (kill the organisms listed on the product’s label) on the surface. Disinfectants which do not remain wet for the recommended dwell time do not kill as many germs and are not meeting EPA guidelines.
Refer to the chemical manufacturer’s guidelines for the proper dwell time for effective disinfection.
Toilets are one of the biggest pain points of a dirty restroom.
Apply cleaner/disinfectant to all high-touch point areas including:
Toilets
Urinals
Sinks
Dispensers
Door handles
Move on to the next steps and allow the solution to sit on the surface for the recommended dwell time. We will come back to this step in step 12.
Cleaning and disinfecting are two different procedures which should be completed to effective kill and remove germs from surfaces. To learn more about the proper way to clean and disinfect check out our article, “What is the Difference Between Cleaning and Disinfecting?”
5. Apply a Bowl Treatment
Flush and use the bowl brush to force water over the trap to remove excess water.
Apply the bowl cleaner to the inside of the toilet bowl, starting as close to the rim as possible. Allow the cleaner to remain on the bowl for the recommended wet dwell time.
Bowl cleaners are available in two variations: acid or non-acid.
For everyday use, non-acid bowl cleaners are recommended.
If you are completing daily cleaning, you should not experience buildup of hard water or mineral stains on the bowl.
If toilet maintenance has not been performed in an extended period of time or you are experiencing a buildup for some other reason, the bowl cleaner may need to dwell for awhile.
When dealing with stubborn mineral buildup, rust, or tarnish, acid bowl cleaners should be used. Due to the harsh nature of acidic cleaners, they should only be used when dealing with stubborn stains or during periodic deep cleans.
6. Dust
Working from top to bottom, dust the above-the-floor surfaces.
After the above-the-floor surfaces have been dusted, dust mop or sweep the floor.
Sweep from the innermost corner to the door.
Make sure that all debris and soils are removed so that the floor is ready to be wet-mopped in step 13.
7. Refill Dispensers & Empty Trash Receptacles
Check supplies in paper towel dispensers, soap dispensers, toilet paper dispensers, and any other dispensers. Refill as needed.
Empty all sanitary napkin bins, trash receptacles, and collect the sharps container for proper disposal.
Apply disinfectant to inside of trash receptacle before replacing the liner and allow to air dry.
8. Wash Walls and Stalls
Spot clean bathroom walls and stalls to remove visible soils. Use disposable microfiber cloths to apply the cleaning/disinfecting solution.
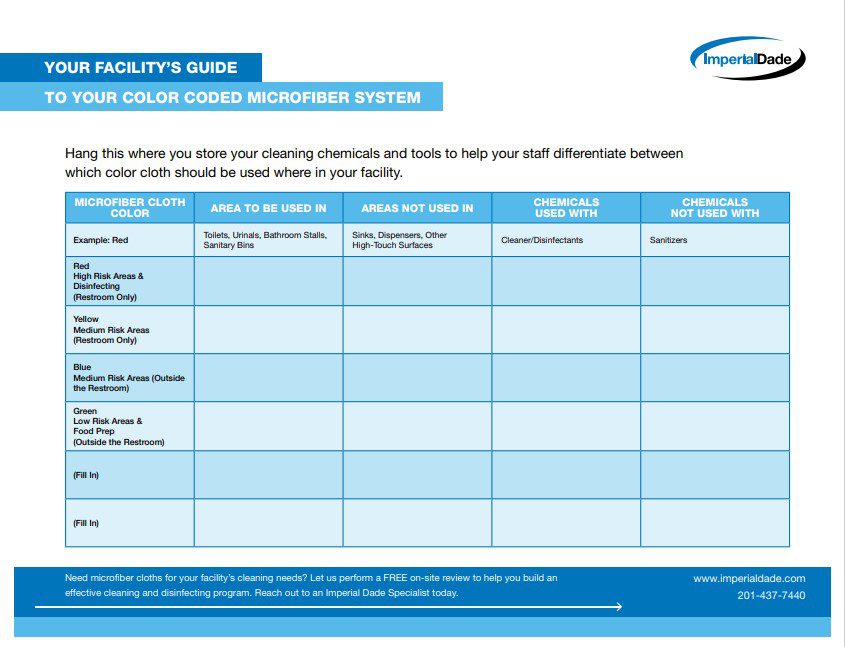
Pro Tip: Disposable (not reusable) microfiber cloths are recommended for cleaning procedures throughout the restroom to avoid quat bindingand to reduce the chance of cross-contamination.
If you are choosing to use reusable microfiber cloths, use different colored microfiber cloths for each different surface in your facility to avoid potential cross-contamination.
Depending on the product check to see if it should be removed after a certain amount of wet dwell time. If necessary, remove the solution from top to bottom. To avoid streaks, apply the solution from bottom to top.
9. Polish
Dry any metal surfaces that were disinfected in step 4. Apply metal polish or glass cleaner to any metal fixtures. Wipe the polish to avoid potential buildup of polish. Sometimes glass cleaner can be used to polish metal surfaces without creating any build up.
Want a copy of these 14 steps to cleaning a commercial restroom?
Download Your FREE Steps to Clean a Commercial Restroom Poster
10. Wipe Mirrors/Glass Areas
Wipe mirrors and glass surfaces using a glass cleaner.
For large glass areas, use a squeegee to improve reach and speed.
Pro Tip: If you are cleaning two-sided glass areas, such as windows or shower doors, wipe horizontally on one side and vertically on the other. If streaks occur, this will allow you to see which side they are on.
11. Clean Floor Drains
There are two types of drain openers: acid and enzyme.
Acid drain openers typically use sulfuric acid to dissolve blockages and unclog drains. They are harsh in nature and should only be used periodically. Acid drain openers should not be used in facilities that have septic tanks. Certain chemicals in acid drain openers can slow or stop the normal activity in a septic tank system.
Enzyme drain openers are safer and less harmful. Enzyme drain openers can be used for daily maintenance to prevent drains from clogging in the first place. They are safe to be used in facilities that have septic tanks.
12. Final Disinfectant Steps
Return to the high-touch areas which you applied cleaner/disinfectant solution to in step 4.
Using a microfiber cloth, wipe from the top of each respective surface or fixture to the bottom.
Make sure you are using different colored microfiber cloths or disposable microfiber cloths for different parts of the restroom, such as the toilets/urinals and sinks, to prevent cross-contamination.
If the fixture is a high-touch surface, make sure to remove all of the cleaner/disinfectant to reduce the chance of guest injury from chemical burns.
Double check to make sure you have disinfected all dispensers, toilets, sinks, and any other touch points you may have missed.
PRO TIP: Using cloths or mops in multiple areas or across different surfaces can lead to cross-contamination. Color-coded microfiber systems can help avoid this and other issues. Download our FREE poster. You can use this poster to educate staff on what color microfiber should be used in which areas or surfaces in your facility!
13. Mop
Check to make sure all dirt and loose soil were removed when dust mopping in step 6.
Wet mop the floor with a microfiber flat mop and cleaner/disinfectant. Using microfiber flat mops for wet mopping will reduce the amount of liquid being applied to the floor without sacrificing disinfection.
Pro Tip: It is important to wet mop after dust mopping. Dust mopping removes large debris and dust while wet mopping removes any stubborn soils and disinfects the floor.
14. Inspect
Inspect your work and report any repairs or damage as needed.
Once you have completed all 14 steps, return all equipment, materials, and supplies to their storage areas.
Make sure you clean and maintain any equipment before returning it to storage.
Check to make sure the area is dry before removing wet floor signs. Wet floors that are opened too early to your guests are hazardous and can lead to slips, falls, and other injuries.
Final Thoughts
Consistently following these 14 steps will lead to a more hygienic restroom, improved restroom appearance, and increased customer satisfaction.
Do you have the right products and equipment to keep your restrooms looking great? If you’re located in the United States, Puerto Rico, or the Caribbean, Imperial Dade has a variety of commercial cleaning supplies and janitorial cleaning equipment to enhance your restroom cleaning and maintenance procedures.