
Are you looking for a way to reduce product waste? Or, maybe you’re looking to reduce the hazards that come with handling concentrated chemicals?
Eliminate the hassle and guesswork involved with diluting chemicals by hand, all while cutting costs and increasing worker safety, by investing in a chemical dilution control system.
In this comprehensive article, we’ll walk you through the simple yet effective process of using a chemical dilution control system. By the end, you’ll be equipped with the necessary knowledge to streamline your chemical dilution process, saving both time and resources.
The Utility of Chemical Dilution Control Systems
Chemical dilution control systems improve cleaning processes by bringing precision to chemical-to-water ratios and eliminating guesswork. The key advantage lies in an ability to automate the dilution process, guaranteeing consistent chemical solutions. Beyond convenience, this precision enhances safety by preventing under or over-dilution risks.
Furthermore, these systems promote cost effectiveness by eliminating the costs associated with excess product usage. In essence, chemical dilution control systems represent a crucial step towards efficient, safe, and cost-effective cleaning practices, making them a vital part of any facility.
Pro Tip: What is Dilution Control?
Dilution control is the process of taking a highly concentrated chemical product and diluting it with water to create a ready-to-go product.
All highly concentrated chemicals require dilution, especially disinfectants, sanitizers, and cleaners. There are two ways to go about chemical dilution: either by hand or by using a dilution control system.
We always recommend using a dilution control system rather than diluting by hand. That’s because there’s always the risk of under or over-diluting a solution when done by a person, which can have negative consequences. For example, under-diluting a disinfectant can be harmful due to its toxicity, causing burns, discomfort, and respiratory irritation.
On the other hand, a dilution control system automates the task of dilution. This way, the risk of improper dilution is effectively minimized, there is consistent product delivery, and you benefit from cost control!
Let’s look at what it takes to use a chemical dilution control system.
How to Use a Dilution Control System
Use this four-step process to safely fill a trigger sprayer or bucket.
- Step 1: Select the Right Chemical
- Step 2: Insert the Output Tube into an Empty Bottle or Bucket
- Step 3: Press and Hold the Release Button
- Step 4: Release the Button
Step 1: Select the Right Chemical
The first step in achieving accurate chemical dilution is selecting the right chemical for the job.
Some dilution control systems allow for multiple chemicals to be connected, while others are dedicated to a single chemical. If your facility’s system has multiple chemicals, be sure to select the right one for the cleaning task at hand.
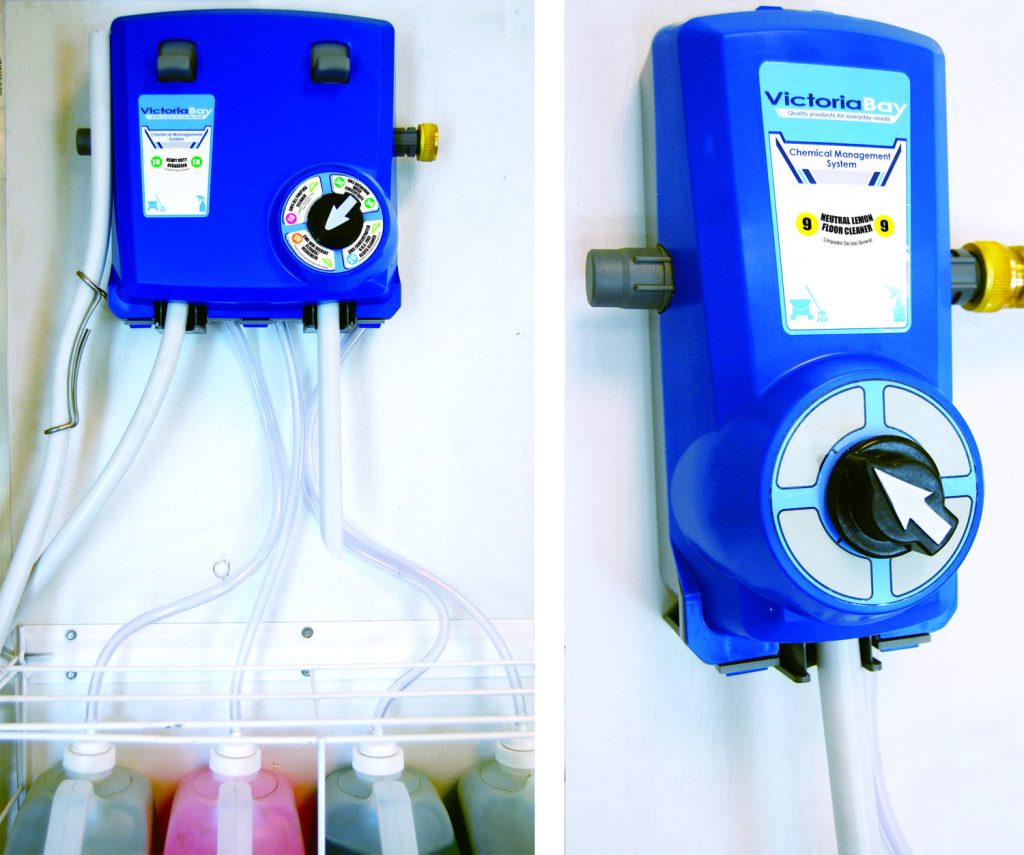
This typically involves either turning a dial or pressing a button to designate the correct chemical.
Step 2: Insert the Output Tube into an Empty Spray Bottle or Bucket
Once the appropriate chemical is selected, it’s time to fill the bottle or bucket.
For a bottle, take the shorter output tube and insert it into an empty spray bottle. Whichever tube is the shortest will have been specifically designed for filling trigger spray bottles.
For a bucket, take the output tube and aim it towards the bucket. The longer tube helps to reduce splashing, but you should at least have it reach just beneath the rim of the bucket. This ensures efficiency and accuracy in the chemical transfer process.
Step 3: Press and Hold the Release Button
Now that your trigger spray bottle or bucket is in place and the chosen chemical is ready, press and hold down the dilution control system’s release button.
Doing so initiates the filling process, allowing a precisely diluted chemical solution to flow into the trigger spray bottle or bucket. This controlled approach minimizes the risk of overfilling and ensures consistency in chemical concentration.
Step 4: Release the Button
Hold the release button until the spray bottle or bucket reaches the desired fill level, taking care not to overfill.
The button should be released just before the chemical reaches the top of the container to avoid overflow.
Once the bottle or bucket is filled, you can remove the output tube. That’s it! You’ve successfully filled your bottle or bucket with the perfect chemical dilution for your cleaning needs.
Labeling and Safety Considerations:
For enhanced safety and productivity, it’s crucial to label both the dilution control system and the trigger spray bottle correctly. Most dilution control systems come equipped with labels displaying the selected chemical.
To prevent cross-contamination, dedicate each spray bottle to a specific chemical. This practice ensures the correct use of personal protective equipment and eliminates the risk of re-cleaning surfaces. By adhering to these safety measures, you create a secure and efficient cleaning environment.
Final Thoughts
Following these simple steps not only streamlines your cleaning routine but also contributes to your bottom line. As your chemical-to-water ratio becomes consistent, so does your cost-per-bottle.
Say goodbye to guesswork, and say hello to savings and a more efficient cleaning process!
If you’re eager to learn more about the role of dilution control systems and other chemical management systems designed to improve safety and enhance worker productivity, consider contacting an Imperial Dade facility near you. Reach out to our jan/san chemical specialists and they’ll be more than happy to help you get started on a chemical dilution control system tailored to your facility’s needs.